Split Training
Feb 4th, 2012 - written by Thomas Bluhm in Strength Training
(0 comments)
Split Training is a very common method for creating workout routines for strength training and body building. In the following article you`ll learn about Split Training, how to apply it successfully and why it has certain advantages as well as disadvantages.
What is Split Training?
Split training describes a workout of arbitrary main muscles in various training sessions. Split in this context means "division". To grow muscles you should focus on a targeted training of the following muscles: chest muscles, shoulder muscles, biceps, triceps, abdomen, back (lats including large and small circular muscles, trapezius muscles), quadriceps, hamstrings and calf muscles. These are the main muscles capable of growing strength as you focus on strength training, or able to gain mass and volume when doing a bodybuilding related workout.Unlike the full-body workout, in which you stimulate all of the main muscles directly or indirectly during a single training session, split training requires you to distribute the workload on different training sessions, usually within a week in order to train the entire body. Full body workouts are usually done 2-3 times per week and thus all major muscles are being stimulated that often. A split training routine, in contrary, contains several different training sessions per week. Depending on how many training days it take to train the complete body , we speak of 2 times, 3 times or more splits.
Here´s a short example of a 3-days split training:
Training session 1 is done on Monday, hitting chest, shoulders and triceps. On Wednesday, during training session 2, you will train back, abdominals and biceps. Finally, on Friday, you choose to workout thighs and calves. As already mentioned, there are further options besides the popular 3-days split. A 4-days split routine allows you to go even more into detail within one week. After an initial full body routine, beginners may want to choose the 2-days split while advances athletes often even use a 5-days split. Very rarely you will find experienced bodybuilders doing a 6 times or even 7-days split training. Here´s why: The primary motivation behind split training is to pay more attention to a single muscle. It enables you to do a lot of sets and repetitions (training volume) per muscle to stimulate it as much as possible.Highly intense split training can increase your muscle growth and may be helpful to break plateaus. For optimal gains in performance and strength it is necessary to maintain a balance of tension and relaxation. Therefore 3-days split trainings with embedded days of rest is recommended. 5-days split routines obviously don´t allow enough resting days.
The Advantages of Split Training
Split training allows you to spend more time training one particular muscle or muscle group. You can do more sets, more exercise and more training variations. It is of course an option to do more sets and exercises even during a full body workout, but this may result in an inadequately increased training time. Remember that your physical and mental performance tends to decrease after one hour of training, which can make it impossible to receive an effective muscular stimulation. After having reached a certain training levels you can build more muscle mass by working out short periods of time with high intensity, provided optimal nutrition and rest.The Disadvantages of Split Training?
As already indicated above, a mismatch between tension and relaxation can cause a lack of muscle growth and even lead to overtraining.Because of the presumed high intensity it might take particular muscles longer to recover from a training session.
How to apply Split Training?
For best results remember the following principles when setting up split trainings:- Hit every major muscle within a week of training.
- Train all required muscles evenly during a training session.
- Spread your training sessions evenly throughout the week.
You may want to make sure that each workout is done in equal intervals. I recommend doing 3-days split training on Mondays, Wednesdays and Fridays, for example. Each training day is followed by a day of rest. The following layout is less ideal: Mondays, Thursdays, Fridays. Try to include related muscles within a training session, which itself should contain the training of one major muscle group and addition one or two smaller muscles. A 3-days split training could look like this:
Training 1 - Mondays (chest, shoulders, triceps)
- Flys
- Bench Press
- Incline Bench Press
- Shoulder Press
- Lateral Raises
- French Press
- Triceps Press
Training 2 - Wednesdays (Back, Abdominals, Biceps)
- Pull Ups
- Barbell Rows
- Dead Lift
- Barbell Curls
- Hammer Curls
- Crunches
- Abdominal Press
Training 3 - Fridays (legs, calves)
- Leg Extension
- Leg Press
- Squats
- Leg Curls
- Stiff Leg Dead Lifts
- Standing Calf Raises
- Seated Calf Raises
Summary
Split training is a common and effective method to enhance muscle growth. It is primarily recommended for experienced athletes. Newcomers or returnees should begin with a with a full body workout. Written by Thomas Bluhm - author, licensed fitness training and owner of the Bodybuilding 2.0 Blog . ... read more
Pull-up & Chin-up Guide | How to do Pull-ups & Chin-ups
Apr 21st, 2010 - written by Stephan in Strength Training
(0 comments)
Without doubt, pull-ups and chin-ups are one of the most effective basic exercises to develop a muscular upper body. They work a large number of muscles simultaneously and, through different grip setups and techniques, offer many different training variations.
Pull-up Benefits
| Strength | Pull-ups are a great exercise to strengthen almost all upper body and arm muscles, including the hand's gripping strength. |
|---|---|
| Muscles | Doing Pull-ups on a regular basis can develop an impressive upper body. |
| Balance | Pull-ups help maintaining the upper body's muscular balance by compensating the popular pressing exercise for chest and front shoulders. |
| Simplicity | Pull-ups require nothing but a fixed horizontal bar or something similar to grasp. Once you're able to perform a few pull-ups, you can train virtually anywhere. |
| Versatility | A variety of grip setups and many training techniques make pull-ups a versatile and interesting exercise. |
Basic Pull-up Instructions
- Stand below pull-up bar and grasp it with wide overhand grip. Hang on bar.
- Bend your knees and cross your lower legs.
- Pull your body up until your upper chest reaches the bar. Look up and keep chest up, leading toward the bar.
- Return with same speed. Keep the arms very slightly bent at the bottom of the motion to maintain the muscular activity. Simultaneously let your your shoulders be pulled up by the bodyweight.
- Repeat.
The Difference Between Pull-ups and Chin-ups
While the basic pulling movement is the same, pull-ups and chin-ups differ in the hand's grip setup.| Pull-ups | Chin-ups |
|---|---|
 |  |
| Palms facing away from you involves less arm flexor muscles and more back. It is harder. | Palms facing you involves less back muscles and more arm flexors. It is easier. |
Pull-up Techniques
Especially for beginners pull-ups a are a major challenge. Not only do they require a good relation of strength and bodyweight, but also a very specific muscular coordination that can only be improved by doing it.Don't stick to Lat Pull-downs for too long. Even if you're strong enough to sit and pull down about your bodyweight, it doesn't mean you're able to do a single correct pull-up, because you're not accustomed to the specific technique. Any great performance on the pull-up bar comes from hard and consistent training.
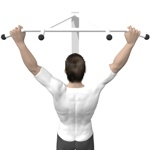
Beginner's Techniques
| Lat Pull-downs | 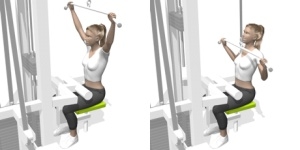 |
|
|---|---|---|
| Assisted Pull-ups, Machine |  |
|
| Assisted Pull-ups, Elastic Band | 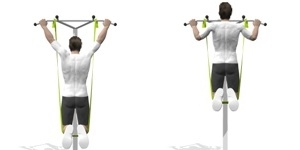 |
|
| Assisted Pull-ups, Training Partner | 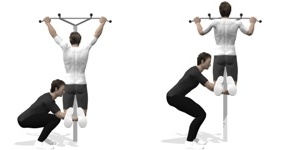 |
|
| Negative Pull-ups | 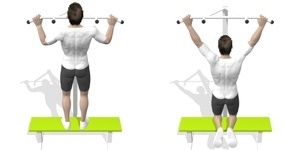 |
|
| Partial Repetitions | 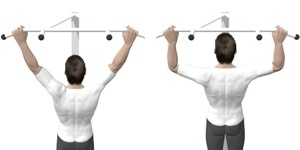 |
|
Advanced Techniques
| Weighted Pull-ups | 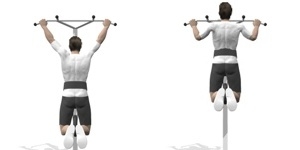 |
|
|---|---|---|
| Slow Negatives | 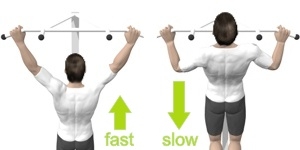 |
|
Pull-up Variations
| Wide Overhand Grip | |
|
|---|---|---|
| Close Overhand Grip | 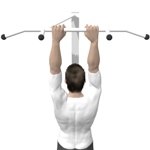 |
|
| Neutral Grip | 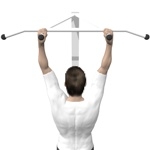 |
|
| Close Neutral Grip | 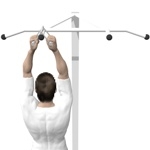 |
|
| Reverse Grip | |
|
| Wide Reverse Grip | 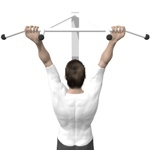 |
|
| Mixed Grip | 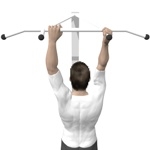 |
|
| One Arm Reverse Grip |  |
|
Common Mistakes
- Straight Arms. Extending the arms completely disables all major muscular activity for a moment, which may result in overstressed passive structures, such as tendons and ligaments.
- Swinging. Try to keep hips and legs as stable as possible. Don't kick legs and don't swing back and forth.
Exercise Guide Links to Pull-ups & Chin-ups
Pull-upPull-up, Assisted
Pull-up, Behind Neck
Pull-up, Close Grip
[linkexercise]bodyweight_v_grip_pull_up[/linkexercise]
Chin-up
... read more
10 Simple Strategie For Gaining Muscle Mass
Mar 18th, 2010 - written by Stephan in Strength Training
(0 comments)
1. Increased Muscular Tension
The conscious flexion of the working muscles over the entire range of motion causes an increased muscular stimulation. This technique particularly suits isolation exercises.
Thus, for example when doing Arm Curls, an extra tightening of the arm flexing muscles at the end of the concentric phase will increase the stimulus to the biceps.
In general, the eccentric part of a movement should be done slowly and deliberately under high muscular tension, which in turn leads to a higher training level, a more intense workout and an improved development of strength and muscle mass.
2. Final Contractions
Final contractions can lead to up to 30% increased muscular stimulation. Simply do 3-5 partial repetitions with almost extended joint positions after finishing a set.For example, after the last repetition of the lat pull-down exercise, before dropping the weight, do a few repetitions in the upper part of the movement. You can apply this technique to almost any strength exercise.
3. Train Complex
A high and complex effort, and thus progressively higher workload is critical to muscular development.You can move the highest weights during basic compound exercises that stimulate many muscles simultaneously and that involve functional movements.
| Complex Exercises For The Upper Body | Complex Exercises For The Lower Body |
|---|---|
|
|
4. Train Standing
Try to do as many exercises as possible in standing position, because it requires and triggers the development of a larger number of stabilizing muscles, especially core muscles.It is important to keep up a correct training technique and to avoid any swinging. This is particularly suitable for the training of the shoulders and arms, for example, Shoulder Presses with Barbell or Dumbbells, Lateral Raises, Arm Curls and Triceps Extension.
3. Variation: Heavy - Light - Heavy
To build muscles, it is important to use heavy weights and to train a the range of 5-8 repetitions.However, muscles need some training variety to constantly develop and to grow.
Switch between heavy load training on the one hand and training with lighter weights on the other. Performing many repetitions with relatively light weights leads to better blood circulation within the affected muscles, resulting in an improved oxygen and results nutrient supply and thus promotes muscle growth.
A very simple and effective method is a permanent heavy weight training in combination with a once per weekly high-rep workout for all major muscle groups.
5. Effective Resting
In order to complete the necessary training volume in minimum time you may want to take advantage of the breaks between sets.Here you either train the corresponding antagonist or any weaknesses, such as Calves or Abdominal Muscles.
Short and intense workouts cause a higher production of hormones that are involved in muscle building.
6. Eat More
To gain weight, you need to take in more energy than you consume. Therefore you need to eat more and you need to eat the right food.To maximize the calorie intake eat mainly foods with a high energy density. Foremost amongst these are healthy fats such as olive oil, canola oil, nuts and peanut butter.
In addition, a sufficient supply of proteins is important. If you cannot meet the daily requirements through diet, it makes sense to resort to supplements, such as protein shakes.
If you are not able to take in large enough amounts of calories through solid food, you need to drink more energy-dense fluids. Drink plenty of milk, preferably whole milk, since the combination of protein and a little more fat leads to a longer digestion time in the stomach, and thus provides more energy of a longer time. Otherwise, high-calorie juices and self-made smoothies, such as milk with oatmeal and fruits, prepared in mixer, are an excellent source of energy.
7. Drink More
Muscles consist to 65% of water. Your muscles won´t grow without a sufficient water supply.The complete protein and fat metabolism is based on an adequate fluid intake. To effectively build muscle mass, you need to dink 1 liter of water per day per 20 kg of body weight.
8. Rest More
Reduce the calorie consumption besides the strength training to a minimum. Avoid long cardio units.Train hard and be lazy for the rest of the day. To ensure a good recovery and muscle growth you need to sleep about 8 hours per night.
9. Eat Directly After Training
After each intense workout, the muscles are hungry for glycogen and amino acids. Fulfill these needs promptly.To make the most of the time window of about 15 minutes, you should either have a full meal, or alternatively drink a whey protein shake together with with rapidly digestible carbohydrates.
10. Think BIG
Ultimately, it is important to be convinced of your own performance and muscle growth.Imagine to already own the desired muscles. Visualize it every day. The right mental cinema provides the necessary motivation.
Set the right priorities in terms of muscle building and developing a certain unwillingness to compromise, that is do everything necessary to reach your goal and to avoid any actions that prevent you from growing muscles.
... read more
The Best Six-Pack Ab Exercises
Mar 2nd, 2010 - written by Stephan in Strength Training
(0 comments)
At first glance, the best and most effective six-pack ab exercise won´t be recognized as abdominal-specific, because it isn´t the classic and very popular exercise like crunches, leg raises or sit-ups that I´m talking about. Obviously, even crunches don´t offer a really functional core training, hence there are much smarter ways to train and shape the center of your body.
Six-pack Abs Requirements
To get six-pack abs, you have to meet two essential requirements:| Muscles | Strong core muscles are the basis, not just for good-looking abs, that is nothing more than a pleasant side-effect, but for a pain-free back, a good posture and an outstanding training performance, which requires the core muscles to be as strong as possible. |
|---|---|
| Body Fat | Men need to have a body fat percentage of 10% or lower to show a six-pack ab. Otherwise they remain hidden below a layer of body fat. That, however, means no functional disadvantages at all, you simply don´t have visible abs. |
Complex Training vs. Isolation Training
Currently, the most popular ab exercises are isolation exercise that involve certain rolling-in movements of the upper body, which is no functional way to train your abs. The main purpose of all core muscles is to stabilize the trunk against external forces. Beside stabilization, the obliques serve as torso rotator. Let me summarize:Isolated core training through upper body roll-ins or side-bends is a meaningful act, but does not provide a functional and natural way of core strengthening.
Also the percentage of body fat, as the second important pillar for a six-pack abs, can be influenced more effectively by doing functional and complex exercises, since you activate a large number of muscles simultaneously. This leads to an increased hormone secretion and increased fat burning. A reduction in body fat requires a certain amount of active muscle and an adequate diet, which leads to insight number two:
The more muscles you activate simultaneously during an exercise and the more muscle mass you own, the higher your potential for burning body fat. Therefore you have to do complex exercises, requiring a signficant and functional participation of your core muscles.
The List: The Best Six-pack Ab Exercises
I will divide this list into two categories:- Ab Exercises whose target muscles are mainly abs.
- Non-Ab Exercises that activate a large number of muscles and put high demand on your core muscles.
Ab Exercises
| Exercise Name | Image and Link | Comments |
|---|---|---|
| Crunches, Seated | 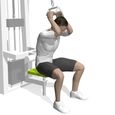 | It is a very effective crunch variation. You can easily adjust the training resistance to even hard levels. The advantage over crunches is the nonexistent external pressure on the vertebral bodies. |
| Plank | 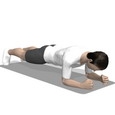 | Plank is an easy-to-do stabilizing exercise. Beware to keep your abs tensed and to avoid any hyper-extension of the lower back. |
| Side Plank | 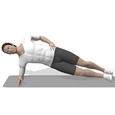 | Side planks train you obliques. It relates to planks and involves many other muscles to keep up the position. |
| Russian Twist, Seated | 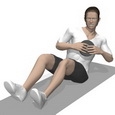 | It is a great exercise for obliques while abdominals serves as stabilizer. Remember to avoid any lower back hyper-extension throughout the motion. |
| Mountain Climbers, Floor Sprint | 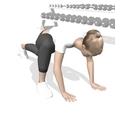 | Das eigentlich Anziehen der Beine wird allein von der Hüftbeugemuskulatur realisiert, die einseitigen Lastwechsel und das Beugen des Oberkörpers aktivieren jedoch sehr stark die schrägen und geraden Bauchmuskeln. Die Liegestützposition erfordert eine Anspannung beinahe aller Muskeln der Körpervorderseite. |
| Reverse Crunch | 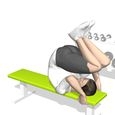 | The upper back fixation combined with the hip pull up results in a significant abdominal workout while relieving the lower back. |
Non-Ab Exercises
| Exercise Name | Image and Link | Comments |
|---|---|---|
| Front Squat | 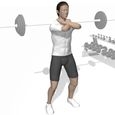 | Front Squats are a fantastic leg workout that requires your torso to be kept as upright as possible, which on the other hand implies high stabilizing effort of your abdominal muscles. The large number of participating muscles makes front squats one of the most effective exercises ever. |
| Suitcase Squat |  | It is a squat variation that, depending on the level of resistance, will train your complete muscles, especially obliques. |
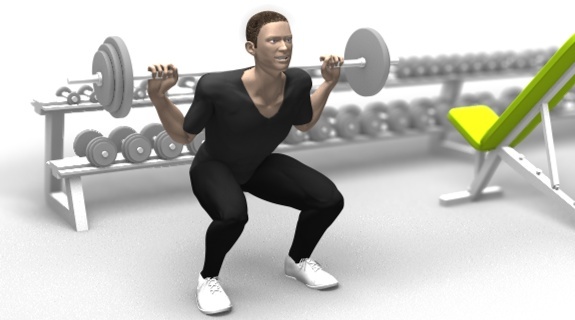
| Overhead Squat | 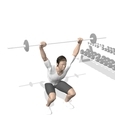 | Holding the barbell above your head is a real challenge for your upper body muscles, while the lifted center of gravity put more emphasis on stabilizing the trunk. Like front squats, it is one of the most effective exercises. |
| Renegade Row | 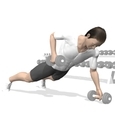 | Balancing the side-to-side load changes really train all core muscles, especially obliques. At the same time the dumbbell pull-up movement and push-up position hit all back, chest and arm muscles, which makes it an extremely demanding exercise. |
| Barbell Deadlift | 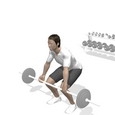 | Deadlift, as one of the classic power lifting and strength training exercises, focuses on training your thighs, lower back and traps. Thus, it is one the best six-pack ab exercises, because he use of relatively high workload enforces a very complex muscular activity |
... read more
Bench Press Video Tutorial | Training Technique | Tips and Tricks
Feb 27th, 2010 - written by Stephan in Strength Training
(0 comments)
Finally I had the opportunity to create a Youtube video out of the Bench Press Tutorial video files. Have a look!
... read more
Training 101: Machines or Free Weights?
Jan 27th, 2010 - written by Stephan in Strength Training
(0 comments)
Introduction
Basically strength training is done either with free weights, mostly dumbbells, barbells and several variations of the barbell, or with machines. A balanced training routine offers enough room for both, free weights and machines. However, for an effective muscle growth or strength training you should prefer the use of free weights. Here´s why?
Machines
Machines are designed to offer a pre-defined training direction and sometimes even range of motion. Stabilizing the training weight and the own body weight and is mostly taken by the machines. Consequently you train only the necessary muscles. This type of training is very specific; it is simple to do and bears only low potential for error and injury. The major disadvantage is the limited complexity and thus effectiveness. What does that mean? The degree of complexity of an exercise, in large part, determines the training effect. The more muscles you involve in a movement, directly or indirectly, the higher the overall training stimulus will be. Here three terms come into play:| Target Muscle | the major group of muscles involved in an exercise |
|---|---|
| Synergists | they support the movement directly |
| Stabilizers | contracting muscles with no significant movement to fixate joints or to maintain a certain posture |
While training on machines, you usually involve only agonists and synergists, stabilizers play only a small role.
Free Weights
Unlike when using free weights. Here, too, in principle, each exercise follows a defined movement, but it is solely the responsibility of the athlete to do a correct technique, to fixate the body in an ideal position and to stabilize the training weight. Free weight training improves the co-ordination skills and body awareness, and represents a great physical challenge in its complexity in the interplay between directly and indirectly involved muscle groups, with greater potential for development.Conclusion
As initially mentioned, the use of machines offers an entirely adequate training. However, when it comes to the basic development of strength and co-ordination or a balanced growth of muscle mass, the use of free weights is the smarter choice.... read more
How to Squat in a Correct Way
Jan 22nd, 2010 - written by Stephan in Strength Training
(0 comments)
Introduction
Of all compound strength training exercises squats are probably most the effective way to strengthen legs as well as almost the entire body. Therefore everyone following an ambitious strength training routine should include squats regularly.Squats are also one of the hardest-to-learn exercises. A proper technique is important to exercise safely and effectively and to protect the body from injury.
Besides the classic barbell squat, which I will explain more in detail below, there are several other squat variations that rely on the basic training technique.
Squat Benefits
| Full Body Strength | Squats require the use of the entire body, especially when using relatively heavy weights. Leg and hip muscles experience a high dynamic impact while almost all other muscles serve as stabilizers. |
|---|---|
| Muscle Building | The simultaneous workout of many muscle groups leads to increased testosterone level in the body, which ultimately leads to increased muscle mass, not only in the legs. |
| Stabilization | Provided a correct training technique, squats are very well suited to stabilize the knee joints, because the high level of muscular activity and co-ordination is strengthening all surrounding muscles and passive structures. Also squats are one of the most effective exercises for strengthening and stabilizing the trunk. |
Squat Basics
| Flexibility | Proper squats require a high degree of mobility of the ankle and hip articulations. If the lowering of the hips in a correct fashion is not possible, I recommend have a regular stretching to improve the joints mobility beforehand. |
|---|---|
| Safety | For heavy squats you have to use squat rack, a.k.a. power rack, which enables the positioning of the barbell at a proper height. In addition, most racks provide a lower dumbbell stack to catch the barbell in case of failure in the lowest point. |
Squat Technique
| Squatting Down |
|---|
|
| Squatting Up |
|
Here´s one of the few Youtube videos showing a very good squat technique. Just perfect.
Squat Setup
| Barbell | Place the barbell on the muscles of the upper back and rear shoulders. |
|---|---|
| Stance | Position your feet about shoulder-wide apart while you turn your toes slightly outward, pointing toward the knees. |
| Grip Distance | The grip distance may vary. The closer the distance, the better the tightening of the upper back. |
| Wrists | Keep your wrists as straight as possible. The back carries the weight while hands just stabilize the position. |
| Elbows | Let the elbows point down behind to keep up a tight upper back. |
| Head & Neck | While squatting you have to permanently look ahead or slightly up to keep your back straight. |
| Upper Back | Keep all upper back muscles tight to provided a solid and safe base for the barbell. |
| Chest | When tightening your upper back, your chest move up. Keep it up to avoid any rounding of the back. |
| Trunk | Tense all muscles to maintain a lower straight back. |
| Balance | During squats move your body weight on your heels. You should be able to (in theory) permanently curl your toes off the floor. |
Squat Variations
There is a variety of squat variations to intensify or to simplify this exercise, or to demand certain muscles in a different way.| Name | Image | Exercise Link |
|---|---|---|
| Barbell Squat | 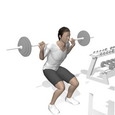 | Squat |
| Barbell Squat, Full ROM | 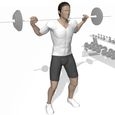 | Full Squat |
| Barbell Front Squat |  | Squat, Front |
| Barbell Front Squat, Full ROM | | Full Squat, Front |
| Barbell Squat, wide Stance |  | Squat, Wide Stance |
| Squat, Smith Press |  | Smith Squat |
| Dumbbell Squat | 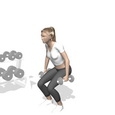 | Squat |
| One Leg Squat | 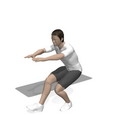 | Squat, One Leg |
| Overhead Squat | | Squat, Overhead |
| Goblet Squat | 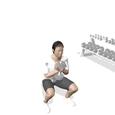 | Goblet Squat |
Common Mistakes
| Bending the Torso | Keep your torso as upright as possible. It is important to push your hips up in a calm and focused way to avoid a delayed raising of the upper body. | ||
|---|---|---|---|
| Looking Down | That leads to a rounding and instability in the back. Always look straight forward or slightly upward keep your back remains. | ||
| Raising Heels | The weight is shifted to the heels. Prevent them from lifting off. Shortened calf and thigh muscles can make it difficult to do the desired range of motion. | ||
| Knees beyond toe tips | Imagine sitting down on a chair. While lowering the hips move backwards. When squatting up, move your hips straight into upright position. Avoid any forward motion. | ||
| Extended Knees | Never lock the knees in the upper position. Locked knees shift much of the workload from the muscles right into the knees, causing an intermittent muscular tension and high pressure inside the knee articulations, which can lead to knee pain. |
... read more
Push-ups: Correct Training Technique and Variations
Jan 17th, 2010 - written by Stephan in Strength Training
(0 comments)
Introduction
Without doubt push-ups are the most popular bodyweight exercise. They strengthen almost the entire body, especially chest, shoulders and arm muscles, they are available in many variations, you can do them without any equipment and the technique is quite easy to learn. Yet, it takes some basic knowledge to do push-ups correctly, because like with any other strength training exercise, also push-ups bear the potential of mistakes that may lead to injuries and pains. Therefore read this guide to a correct push-up training technique.
Push-up Benefits
| Strength | Working with your own bodyweight requires great effort and makes push-ups the a perfect exercise for strengthening the muscles of the torso. |
|---|---|
| Muscle Growth | Anyone who does push-ups on a regular basis may soon be pleased to develop some muscles. Push-ups mainly build chest, front shoulders and triceps muscles. |
| Effectiveness | Besides the dynamically active muscles push-ups also put high demand on many stabilizing muscles, which an almost total body workout out of this exercise. |
| Simplicity | A great advantage is the simplicity of push-ups. You can do push-ups almost anywhere and anytime. |
Push-up Technique
- Place your hands slightly more than shoulder-wide apart on the floor.
- Then extend you body, place feet with toe tips on floor as well and hold your body above the floor while keeping your arms almost extended.
- Now bend your elbows and lower your body until the chest almost touches the floor and your elbows are bent about at right angles.
- Press your body up into the starting position, elbows remain slightly bent.
- Repeat as often as possible, provided a correct training technique.
Push-up Setup
| Hands | Place the hands slightly wider than shoulder-wide apart, not too far away. Let the fingertips point forward. |
|---|---|
| Wrists | Placing the palm flat on the floor can occasionally lead to pain within the strongly extended wrists. In this case, it is better to do the push-ups on the fists or with handles, which allows the wrists to stay straight. |
| Upper Arms | Hold your upper arms between almost perpendicular to the upper body or close to the upper body, depending on the type of push-up. |
| Waist | Keep the abdominal muscles tight. Shoulders, hips and ankles form a straight line. Do not allow the body to sag. |
| Glutes | Also keep the gluteal muscles tight. Along with the abdominal tension it prevents the body from sagging. |
| Head | Keep the head aligned to the spine in a neutral position and look down. |
Push-up Variations
There are a variety of push-up variations that make this exercise either lighter or heavier or have that shift the demand on different muscles involved.| Name | Image | Target Muscle | Link |
|---|---|---|---|
| Push-up | 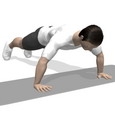 | Pectoralis Major, Sternal | Push-up |
| Push-up, Close Grip |  | Triceps Brachii | Push-up, Close |
| Push-up, incline | 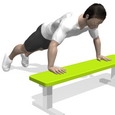 | Pectoralis Major, Sternal | Push-up, Incline |
| Push-up, decline | 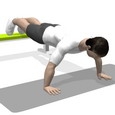 | Pectoralis Major, Clavicular | Push-up, Decline |
| Push-up, Diamond | 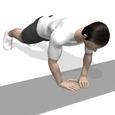 | Triceps | Push-up, Diamond |
| Push-up, with Elastic Band |  | Pectoralis Major, Sternal | Push-up |
| Push-up, on Knees |  | Pectoralis Major, Sternal | Push-up, On Knees |
| Push-up, One Arm | 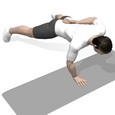 | Pectoralis Major, Sternal | Push-up, One Arm |
Common Mistakes
| Overextended Wrists | As mentioned before, some people may experience pain from overextended wrists. In this case it is better to perform the push-ups on the fists or with special push-up grips. | ||
|---|---|---|---|
| Sagging body | . | ||
| Head Leading | During push-ups keep neck and head aligned to the body. Move your chest to the ground and let your head follow the motion. | ||
| Looking ahead | To avoid unfavorable strains or injuries in the neck, it is very important to look down in a neutral fashion while doing push-ups. | ||
| Upper Arm Abduction | For the shoulder joints secure the upper arm angles are between slightly below perpendicular to the body and near besides the body. |
... read more
Video: 500 Exercises Compilation
Jan 10th, 2010 - written by Stephan Arndt in Strength Training
(0 comments)
This post is for all those among you who ever wondered how it looks like to have 500 different fitness exercises summarized as a 10-minute video snippet :-)
... read more
Bench Press: A Comprehensive Exercise Guide
Jan 5th, 2010 - written by Stephan in Strength Training
(0 comments)
Introduction
Bench press is one of the most popular weight training exercises. It is a basic upper body exercise for the chest muscles.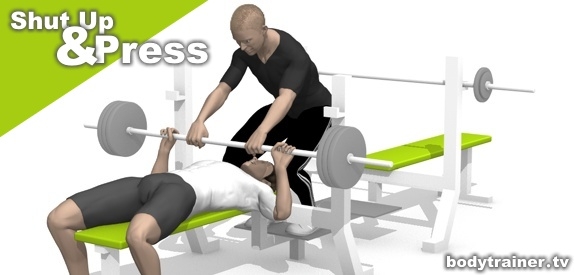
Due to its compound mechanics, bench press enables you to lift relatively large weights and to develop great upper body strength.
A widespread prejudice is that bench press is a "dangerous" exercise, which is not true at all. Bench press, in all its variations, is as safe as any other free weight lifting exercise.
Occurring difficulties or even injuries in the shoulder joints can usually be traced back to a wrong training technique, inadequate preparation or the use of too much weight.
Benefits
| Development of Strength | Bench Presses let you lift relatively large weights, which makes it one of the most effective upper body exercises to build strength. |
|---|---|
| Muscle Growth | Bench Presses can help building an impressive torso. It is a great exercise for developing chest, front deltoids and triceps. |
| Effective Training | Doing Bench Press and few Bench Press variations basically provides an adequate training for the muscles involved. There´s no urgent need to experiment with a lot of other exercises. Improve your Bench Press performance, and so will your physique. |
Bench Press Instructions
- Lie supine on the bench of a bench press rack.
- Grasp the bar with the desired fashion, dismount it from the rack and, with arms extended, hold it above your chest.
- Lower the weight in a straight line down to your chest while forearms travel perpendicular to torso, looking from the side.
- Then press the weight up until arms are extended. , that is a Bench Press.
Bench Press Variations
There are several grip options and bench angles available to add versatility to your bench press training:| Name | Image | Target Muscle | Link |
|---|---|---|---|
| Bench Press | 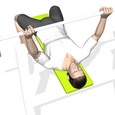 | Pectoralis Major, Sternal | Bench Press |
| Close Grip Bench Press | 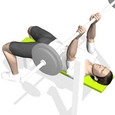 | Triceps Brachii | Bench Press, Close Grip |
| Incline Bench Press | 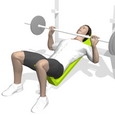 | Pectoralis Major, Clavicular | Bench Press, Incline |
| Decline Bench Press | 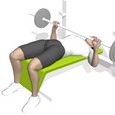 | Pectoralis Major, Sternal | Bench Press, Decline |
| Floor Press | 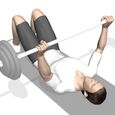 | Triceps Brachii | Floor Press |
| Reverse Grip Bench Press | 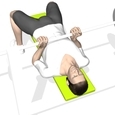 | Triceps Brachii | Bench Press, Reverse Grip |
Bench Press Technique
| Grip_Distance | Gripping too close shifts workload to the triceps and weakens the pushing force. Gripping too wide compromises the range of motion. A good estimation is vertical forearms as bar touches chest. |
|---|---|
| Grip_Setup | Place the bar in the palm of your hands and secure it with your thumbs. |
| Torso_Posture | Always keep your chest up. Tense your back, bring your shoulder blades together and pull your shoulders back to create a safe and solid foundation to lie on and to press the bar up from. Don´t let your shoulders roll forward. |
| Feet_Position | Place your feet wide apart and put them flat on the floor. Keep your knees bent about right-angled and shift the weight on heels. |
| Head_Position | Keep your head in neutral position on bench. Don´t press it into the pad to prevent the neck from being overstressed. |
Range of Motion (ROM)
The Bench Press range of motion is a controversial issue. Science has proved that a limited range of motion for the negative as well as for the positive part of the movement are the safer choice for the shoulder and elbow articulations and offer the same training effect as full range of motion. This insight leads to the following consequence for your Bench Press training: Avoid any extreme joint positions. Don´t lock your arms at top of motion and don´t let your elbows travel far below height of shoulders at bottom of motion.| Bottom Position | Top Position | |
|---|---|---|
| Full Range of Motion | 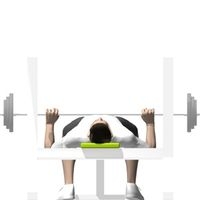 | 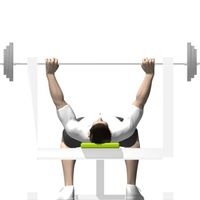 |
| Limited Range of Motion | 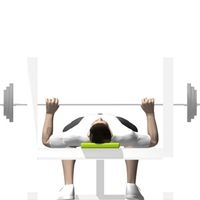 | 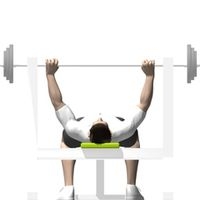 |
Bench Press Safety
| Warm_Up | Before doing Bench Presses with high resistance, have an initial overall warm up followed by a short local warm up of 15-20 repetitions with about 40-50% of the estimated maximum weight you Bench Press. |
|---|---|
| Weights | Learn the correct technique first and begin with light weight. Progressively add weight, always under the prerequisite of a proper training technique. |
| Posture | Keep your buttocks on the bench and prevent them from lifting off, because that will increase the risk of overextending your lower back. |
| Thumbs | Use your thumbs to hold the bar, otherwise it may slip out of your hand. |
| Spotter | It is recommended to Bench Press with a training partner or any other spotter. They will offer support if you´re unable to lift the bar off the chest. |
Bench Press Injuries and Pains
Shoulder Problems
- Posture: If you have slouching shoulders caused by long-term seated or other one-sided positions, you should stretch your chest as well as your front shoulders. Also train your middle back and rear deltoids on a regular basis.
- Imbalances: Bench Press, besides almost any other chest exercise, also trains your front shoulders, which may lead to an imbalance between the strong front and weaker rear shoulders. Consequently and permanently your upper arm bone is slightly being pulled out of its natural position within the shoulder joint, causing pains and making it less resilient. Again, stretch the muscles of the anterior torso be stretched while the muscles of the rear torso have to be strengthened
Lower Back Problems
- Posture: Keep your Gluteus on the bench to dis-burden your lower back. To relieve the lower back from any pressure, raise your thighs up perpendicular to the floor and bend your knees. Consider that this position costs some stability.[/bold]
Common Mistakes
- Inefficient Dismounting: Dismount the barbell from the rack with straight arms, because that let´s you carry most weight. Lock your elbows and move barbell above your chest.
- Pressing to Shoulders: Move the barbell up and down above your chest, not towards or above your shoulders.
- Upper Arm Position: Keep your upper arms perpendicular to your torso or, when doing close grip bench press, close to your torso. Raising the upper arms above perpendicular to your torso forces your shoulder joints into a weak and vulnerable position.
- Bent wrists: Keep your wrists as straight as possible and hold the bar close to your wrists.
- Overextended back: Lifting your Gluteus will limit the range of motion. Worst of all, it moves your lumbar spine into an overextended position causing unusual high pressure that may lead to back pain.
... read more
tags:
bench press |
bench |
press |
barbell |
technique |
guide |
shoulder |
pain |
injuries |
exercise |
training |
