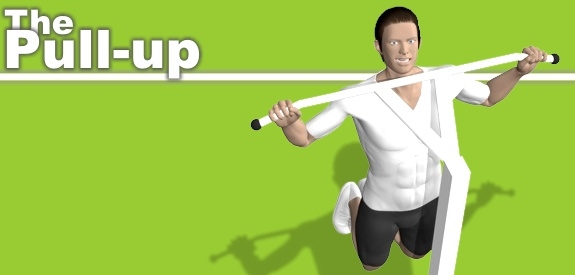
Without doubt, pull-ups and chin-ups are one of the most effective basic exercises to develop a muscular upper body. They work a large number of muscles simultaneously and, through different grip setups and techniques, offer many different training variations.
Pull-up Benefits
Strength
Pull-ups are a great exercise to strengthen almost all upper body and arm muscles, including the hand's gripping strength.
Muscles
Doing Pull-ups on a regular basis can develop an impressive upper body.
Balance
Pull-ups help maintaining the upper body's muscular balance by compensating the popular pressing exercise for chest and front shoulders.
Simplicity
Pull-ups require nothing but a fixed horizontal bar or something similar to grasp. Once you're able to perform a few pull-ups, you can train virtually anywhere.
Versatility
A variety of grip setups and many training techniques make pull-ups a versatile and interesting exercise.
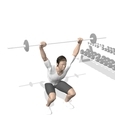
Basic Pull-up Instructions
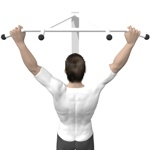
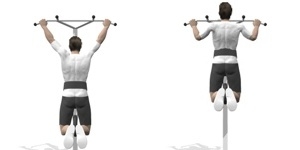
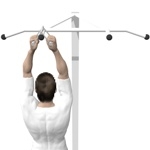
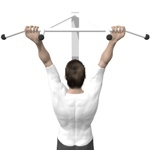
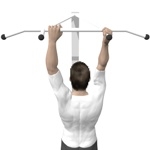
Stand below pull-up bar and grasp it with wide overhand grip. Hang on bar.
Bend your knees and cross your lower legs.
Pull your body up until your upper chest reaches the bar. Look up and keep chest up, leading toward the bar.
Return with same speed. Keep the arms very slightly bent at the bottom of the motion to maintain the muscular activity. Simultaneously let your your shoulders be pulled up by the bodyweight.
Repeat.
The Difference Between Pull-ups and Chin-ups
While the basic pulling movement is the same, pull-ups and chin-ups differ in the hand's grip setup.
Pull-ups
Chin-ups
Palms facing away from you involves less arm flexor muscles and more back. It is harder.
Palms facing you involves less back muscles and more arm flexors. It is easier.
Pull-up Techniques
Especially for beginners pull-ups a are a major challenge. Not only do they require a good relation of strength and bodyweight, but also a very specific muscular coordination that can only be improved by doing it.
Don't stick to Lat Pull-downs for too long. Even if you're strong enough to sit and pull down about your bodyweight, it doesn't mean you're able to do a single correct pull-up, because you're not accustomed to the specific technique. Any great performance on the pull-up bar comes from hard and consistent training.
Beginner's Techniques
Lat Pull-downs
Introduction to the basic movement patterns of arm and shoulder joints.
Adjustable training weight.
Different grip attachments.
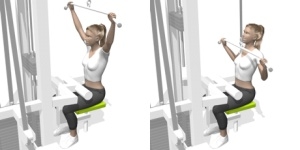
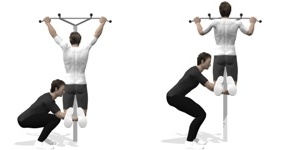
Assisted Pull-ups, Machine
Closely related to free pull-ups.
Bodyweight is supported by training weight.
Usually allows wide and neutral grip setup.
Two separate handles allow an upright posture.
Assisted Pull-ups, Elastic Band
Free pull-up technique.
Bodyweight is supported by an elastic band you either kneel or stand on.
Adjustable training level by selecting from different elastic bands.
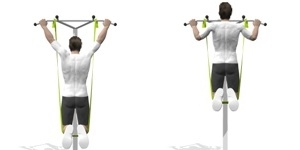
Assisted Pull-ups, Training Partner
Free pull-up technique.
Requires a certain level of basic strength.
Bodyweight is supported by the training partner, at least during the pull-up movement.
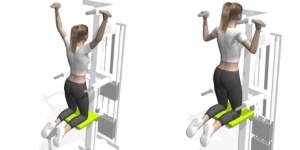
Negative Pull-ups
Free pull-up technique.
Requires a certain level of basic strength.
No external support.
Grasp pull-up bar while standing on elevation and, as slowly as possible, perform only the negative movement.
Partial Repetitions
Free pull-up technique.
Requires a certain level of basic strength.
No external support
Grasp pull-up bar and pull body about half way up.
Advanced Techniques
Weighted Pull-ups
If you can do 10 or more pull-ups, you may want to use a weight belt/chain to add some weight. Alternatively use a rucksack with weight plates (or books, ...) in it or hold a dumbbell between your feet.
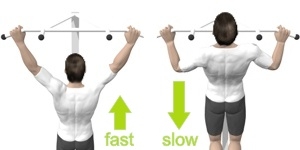
Slow Negatives
Putting the emphasis on the negative part of the motion will activate a maximum number of muscle fibers.
Pull you body up as usual and take about 4-5 seconds to return to the starting position.
Pull-up Variations
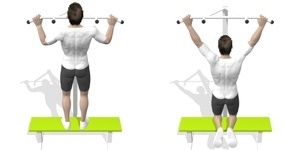
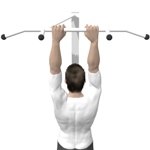
Wide Overhand Grip
Choose a more than shoulder-wide grip distance. You elbows should be bent about right-angled at top of motion. A too wide grip distance will limit the range of motion.
Close Overhand Grip
A shoulder-wide or even closer grip distance requires your arms to be bent almost completely, resulting in a higher demand of the arm muscles.
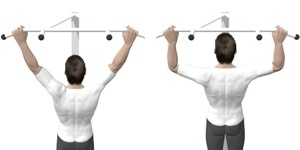
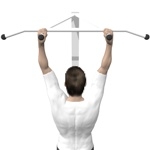
Neutral Grip
Usually the neutral grip is setup slightly wider than shoulder-wide apart. It allows a comfortable hand position and an even training of back and arms.
Close Neutral Grip
The close neutral grip distance trains more arms, less back.
Reverse Grip
As mentioned above, reverse grip pull-ups are also called chin-ups. They put more emphasis the arm flexors, less back.
Wide Reverse Grip
To involve more back when doing chin-ups, choose a wide reverse grip, provided your wrists tolerate this setup pain-free.
Mixed Grip
Mixed grip is a combination of neutral and overhand or underhand grip. Remember to train both sides evenly.
One Arm Reverse Grip
If you're strong enough, you can do one arm chin-ups. It requires an excellent relation of strength and bodyweight. Because of its high demand one arm chin-ups usually aren't part of a normal training routine.
Common Mistakes
Straight Arms. Extending the arms completely disables all major muscular activity for a moment, which may result in overstressed passive structures, such as tendons and ligaments.
Swinging. Try to keep hips and legs as stable as possible. Don't kick legs and don't swing back and forth.
Of all compound strength training exercises squats are probably most the effective way to strengthen legs as well as almost the entire body. Therefore everyone following an ambitious strength training routine should include squats regularly.
Squats are also one of the hardest-to-learn exercises. A proper technique is important to exercise safely and effectively and to protect the body from injury.
Besides the classic barbell squat, which I will explain more in detail below, there are several other squat variations that rely on the basic training technique.
Squat Benefits
Full Body Strength
Squats require the use of the entire body, especially when using relatively heavy weights. Leg and hip muscles experience a high dynamic impact while almost all other muscles serve as stabilizers.
Muscle Building
The simultaneous workout of many muscle groups leads to increased testosterone level in the body, which ultimately leads to increased muscle mass, not only in the legs.
Stabilization
Provided a correct training technique, squats are very well suited to stabilize the knee joints, because the high level of muscular activity and co-ordination is strengthening all surrounding muscles and passive structures. Also squats are one of the most effective exercises for strengthening and stabilizing the trunk.
Squat Basics
Flexibility
Proper squats require a high degree of mobility of the ankle and hip articulations. If the lowering of the hips in a correct fashion is not possible, I recommend have a regular stretching to improve the joints mobility beforehand.
Safety
For heavy squats you have to use squat rack, a.k.a. power rack, which enables the positioning of the barbell at a proper height. In addition, most racks provide a lower dumbbell stack to catch the barbell in case of failure in the lowest point.
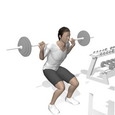
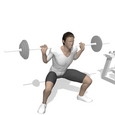
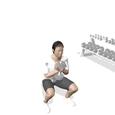
Squat Technique
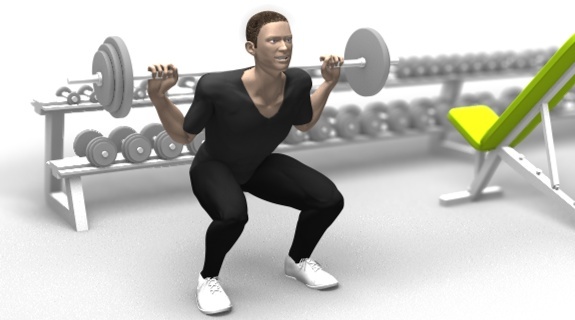
Squatting Down
Grasp the barbell with your hands slightly more than shoulder-wide apart and place it on the upper back and rear Deltoids. When using heavy weights you have to stay inside a squat rack.
Then lift the barbell from the rack, place your feet about shoulder-wide apart and turn them slightly outside. Keep your body upright. Also keep knees slightly bent and tense the body.
Now bend your knees and lower your hips back as if you were sitting down until your thighs are about parallel to the ground. Your knees have to stay above your toes, pointing slightly out.
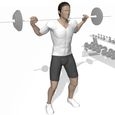
Squatting Up
Now press your hips back up. Firmly tighten your buttocks. Beware to move your hips up and not to front, otherwise your knees will be pushed beyond your toe tips.
Keep your body weight shifted to your heels, they are the basis for a powerful squatting up..
In the top position stand upright again. Your knees have to stay slightly bent.
Here´s one of the few Youtube videos showing a very good squat technique. Just perfect.
Squat Setup
Barbell
Place the barbell on the muscles of the upper back and rear shoulders.
Stance
Position your feet about shoulder-wide apart while you turn your toes slightly outward, pointing toward the knees.
Grip Distance
The grip distance may vary. The closer the distance, the better the tightening of the upper back.
Wrists
Keep your wrists as straight as possible. The back carries the weight while hands just stabilize the position.
Elbows
Let the elbows point down behind to keep up a tight upper back.
Head & Neck
While squatting you have to permanently look ahead or slightly up to keep your back straight.
Upper Back
Keep all upper back muscles tight to provided a solid and safe base for the barbell.
Chest
When tightening your upper back, your chest move up. Keep it up to avoid any rounding of the back.
Trunk
Tense all muscles to maintain a lower straight back.
Balance
During squats move your body weight on your heels. You should be able to (in theory) permanently curl your toes off the floor.
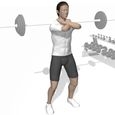
Squat Variations
There is a variety of squat variations to intensify or to simplify this exercise, or to demand certain muscles in a different way.
Keep your torso as upright as possible. It is important to push your hips up in a calm and focused way to avoid a delayed raising of the upper body.
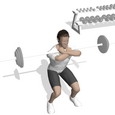
Looking Down
That leads to a rounding and instability in the back. Always look straight forward or slightly upward keep your back remains.
Raising Heels
The weight is shifted to the heels. Prevent them from lifting off. Shortened calf and thigh muscles can make it difficult to do the desired range of motion.
Knees beyond toe tips
Imagine sitting down on a chair. While lowering the hips move backwards. When squatting up, move your hips straight into upright position. Avoid any forward motion.
Extended Knees
Never lock the knees in the upper position. Locked knees shift much of the workload from the muscles right into the knees, causing an intermittent muscular tension and high pressure inside the knee articulations, which can lead to knee pain.
Without doubt push-ups are the most popular bodyweight exercise. They strengthen almost the entire body, especially chest, shoulders and arm muscles, they are available in many variations, you can do them without any equipment and the technique is quite easy to learn. Yet, it takes some basic knowledge to do push-ups correctly, because like with any other strength training exercise, also push-ups bear the potential of mistakes that may lead to injuries and pains. Therefore read this guide to a correct push-up training technique.
Push-up Benefits
Strength
Working with your own bodyweight requires great effort and makes push-ups the a perfect exercise for strengthening the muscles of the torso.
Muscle Growth
Anyone who does push-ups on a regular basis may soon be pleased to develop some muscles. Push-ups mainly build chest, front shoulders and triceps muscles.
Effectiveness
Besides the dynamically active muscles push-ups also put high demand on many stabilizing muscles, which an almost total body workout out of this exercise.
Simplicity
A great advantage is the simplicity of push-ups. You can do push-ups almost anywhere and anytime.
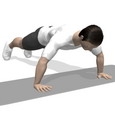
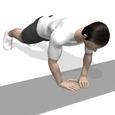
Push-up Technique
Place your hands slightly more than shoulder-wide apart on the floor.
Then extend you body, place feet with toe tips on floor as well and hold your body above the floor while keeping your arms almost extended.
Now bend your elbows and lower your body until the chest almost touches the floor and your elbows are bent about at right angles.
Press your body up into the starting position, elbows remain slightly bent.
Repeat as often as possible, provided a correct training technique.
Push-up Setup
Hands
Place the hands slightly wider than shoulder-wide apart, not too far away. Let the fingertips point forward.
Wrists
Placing the palm flat on the floor can occasionally lead to pain within the strongly extended wrists. In this case, it is better to do the push-ups on the fists or with handles, which allows the wrists to stay straight.
Upper Arms
Hold your upper arms between almost perpendicular to the upper body or close to the upper body, depending on the type of push-up.
Waist
Keep the abdominal muscles tight. Shoulders, hips and ankles form a straight line. Do not allow the body to sag.
Glutes
Also keep the gluteal muscles tight. Along with the abdominal tension it prevents the body from sagging.
Head
Keep the head aligned to the spine in a neutral position and look down.
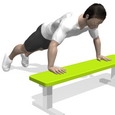
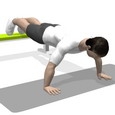
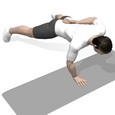
Push-up Variations
There are a variety of push-up variations that make this exercise either lighter or heavier or have that shift the demand on different muscles involved.
As mentioned before, some people may experience pain from overextended wrists. In this case it is better to perform the push-ups on the fists or with special push-up grips.
Sagging body
.
Head Leading
During push-ups keep neck and head aligned to the body. Move your chest to the ground and let your head follow the motion.
Looking ahead
To avoid unfavorable strains or injuries in the neck, it is very important to look down in a neutral fashion while doing push-ups.
Upper Arm Abduction
For the shoulder joints secure the upper arm angles are between slightly below perpendicular to the body and near besides the body.
Bench press is one of the most popular weight training exercises. It is a basic upper body exercise for the chest muscles.
Due to its compound mechanics, bench press enables you to lift relatively large weights and to develop great upper body strength.
A widespread prejudice is that bench press is a "dangerous" exercise, which is not true at all. Bench press, in all its variations, is as safe as any other free weight lifting exercise.
Occurring difficulties or even injuries in the shoulder joints can usually be traced back to a wrong training technique, inadequate preparation or the use of too much weight.
Benefits
Development of Strength
Bench Presses let you lift relatively large weights, which makes it one of the most effective upper body exercises to build strength.
Muscle Growth
Bench Presses can help building an impressive torso. It is a great exercise for developing chest, front deltoids and triceps.
Effective Training
Doing Bench Press and few Bench Press variations basically provides an adequate training for the muscles involved. There´s no urgent need to experiment with a lot of other exercises. Improve your Bench Press performance, and so will your physique.
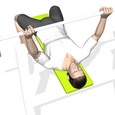
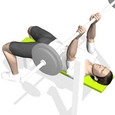
Bench Press Instructions
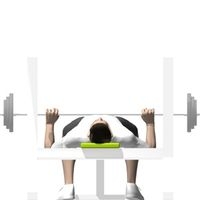
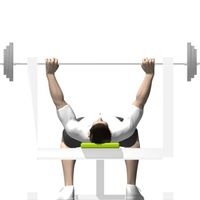
Lie supine on the bench of a bench press rack.
Grasp the bar with the desired fashion, dismount it from the rack and, with arms extended, hold it above your chest.
Lower the weight in a straight line down to your chest while forearms travel perpendicular to torso, looking from the side.
Then press the weight up until arms are extended. , that is a Bench Press.
Bench Press Variations
There are several grip options and bench angles available to add versatility to your bench press training:
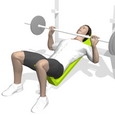
Gripping too close shifts workload to the triceps and weakens the pushing force. Gripping too wide compromises the range of motion. A good estimation is vertical forearms as bar touches chest.
Grip_Setup
Place the bar in the palm of your hands and secure it with your thumbs.
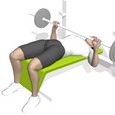
Torso_Posture
Always keep your chest up. Tense your back, bring your shoulder blades together and pull your shoulders back to create a safe and solid foundation to lie on and to press the bar up from. Don´t let your shoulders roll forward.
Feet_Position
Place your feet wide apart and put them flat on the floor. Keep your knees bent about right-angled and shift the weight on heels.
Head_Position
Keep your head in neutral position on bench. Don´t press it into the pad to prevent the neck from being overstressed.
Range of Motion (ROM)
The Bench Press range of motion is a controversial issue. Science has proved that a limited range of motion for the negative as well as for the positive part of the movement are the safer choice for the shoulder and elbow articulations and offer the same training effect as full range of motion. This insight leads to the following consequence for your Bench Press training: Avoid any extreme joint positions. Don´t lock your arms at top of motion and don´t let your elbows travel far below height of shoulders at bottom of motion.
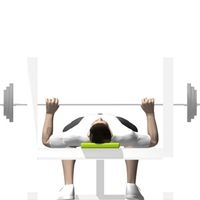
Bottom Position
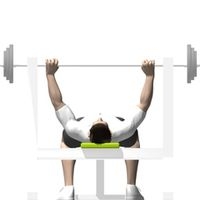
Top Position
Full Range of Motion
Limited Range of Motion
Bench Press Safety
Warm_Up
Before doing Bench Presses with high resistance, have an initial overall warm up followed by a short local warm up of 15-20 repetitions with about 40-50% of the estimated maximum weight you Bench Press.
Weights
Learn the correct technique first and begin with light weight. Progressively add weight, always under the prerequisite of a proper training technique.
Posture
Keep your buttocks on the bench and prevent them from lifting off, because that will increase the risk of overextending your lower back.
Thumbs
Use your thumbs to hold the bar, otherwise it may slip out of your hand.
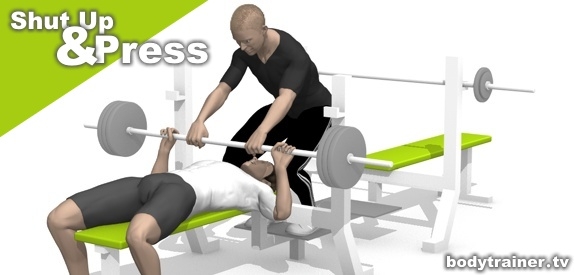
Spotter
It is recommended to Bench Press with a training partner or any other spotter. They will offer support if you´re unable to lift the bar off the chest.
Bench Press Injuries and Pains
Shoulder Problems
Posture: If you have slouching shoulders caused by long-term seated or other one-sided positions, you should stretch your chest as well as your front shoulders. Also train your middle back and rear deltoids on a regular basis.
Imbalances: Bench Press, besides almost any other chest exercise, also trains your front shoulders, which may lead to an imbalance between the strong front and weaker rear shoulders. Consequently and permanently your upper arm bone is slightly being pulled out of its natural position within the shoulder joint, causing pains and making it less resilient. Again, stretch the muscles of the anterior torso be stretched while the muscles of the rear torso have to be strengthened
Lower Back Problems
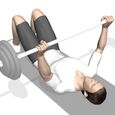
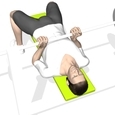
Posture: Keep your Gluteus on the bench to dis-burden your lower back. To relieve the lower back from any pressure, raise your thighs up perpendicular to the floor and bend your knees. Consider that this position costs some stability.[/bold]
Common Mistakes
Inefficient Dismounting: Dismount the barbell from the rack with straight arms, because that let´s you carry most weight. Lock your elbows and move barbell above your chest.
Pressing to Shoulders: Move the barbell up and down above your chest, not towards or above your shoulders.
Upper Arm Position: Keep your upper arms perpendicular to your torso or, when doing close grip bench press, close to your torso. Raising the upper arms above perpendicular to your torso forces your shoulder joints into a weak and vulnerable position.
Bent wrists: Keep your wrists as straight as possible and hold the bar close to your wrists.
Overextended back: Lifting your Gluteus will limit the range of motion. Worst of all, it moves your lumbar spine into an overextended position causing unusual high pressure that may lead to back pain.